Rove + Dwell Blog

Anthropologie Takeover

Anthropologie Takeover

     Some of you may have watched our Instagram Takeover with Anthropologie a few week ago! I was so shocked and excited when I got the call to see if I wanted to do an IG takeover for my local Anthropologie store, I couldn't believe they wanted ME to do it! Of course I said yes, immediately and then started the planning for how I would do this successfully and ruin their whole feed and vibe! 

     I first stalked their feed even more than normal to see what I liked and didn't like about previous takeovers. I realized immediately I'd need to hire a photographer. I contacted a few local and eventually decided to go with Alycia from Love Grace Imagery, she is AMAZING! I was so comfortable and happy during the photoshoot I almost didn't even realize I was having my photos done! Almost.... I am so shy and there are not many photos of me in existence because I just get so nervous!

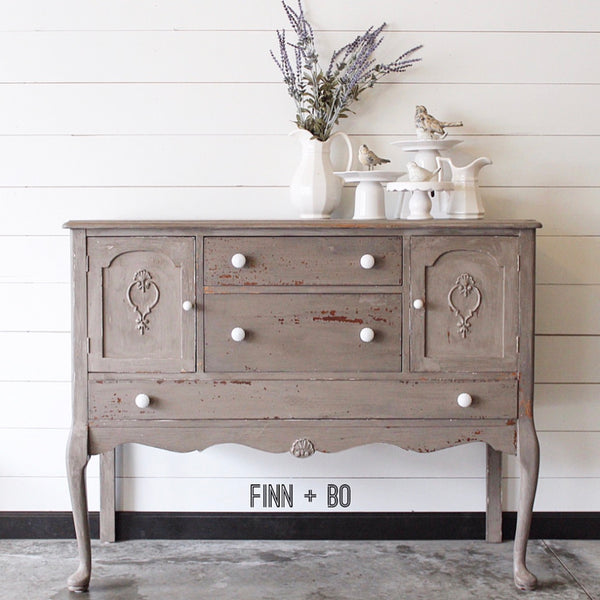
     Alycia and I decided to do a color story for the takeover, I picked some of my favorite colors that i wanted to share and got busy! We had to paint our entire bedroom also so I could photograph by favorite black dresser.. 

     I was so happy to be able to share some of my favorite plants and this adorable sign my friend Kristy at The Painted Nest made for me. I love affirmations and want to create a whole affirmation wall somewhere in our house! With so many kids I think it is a great idea also! A couple of our boys self doubt and criticize themselves regularly and I am constantly telling them to say something positive about yourself! 

     Do you see all of those lovely plants?! I have a serious obsession, and am always finding new plants to love and propagating from old plants to create new little plantlets! I don't think you can really have too many plants in your house! I have 35+ plants just in our bedroom and LOVE IT! I'll have to share more photos once we are done decorating, I am waiting for a huge macrame wall hanging I commissioned from a super talented designer!! 

     Before we starting shooting for the Antrho takeover, Alycia and I met at the store to pick clothes to go along with the color story. I have to admit I was slightly overwhelmed with the whole process and am grateful she was there to guide me and also get me to try stuff that I was all heart eyes over but too self conscious to dare pick for myself! Those outfits turned out to be my faves! 

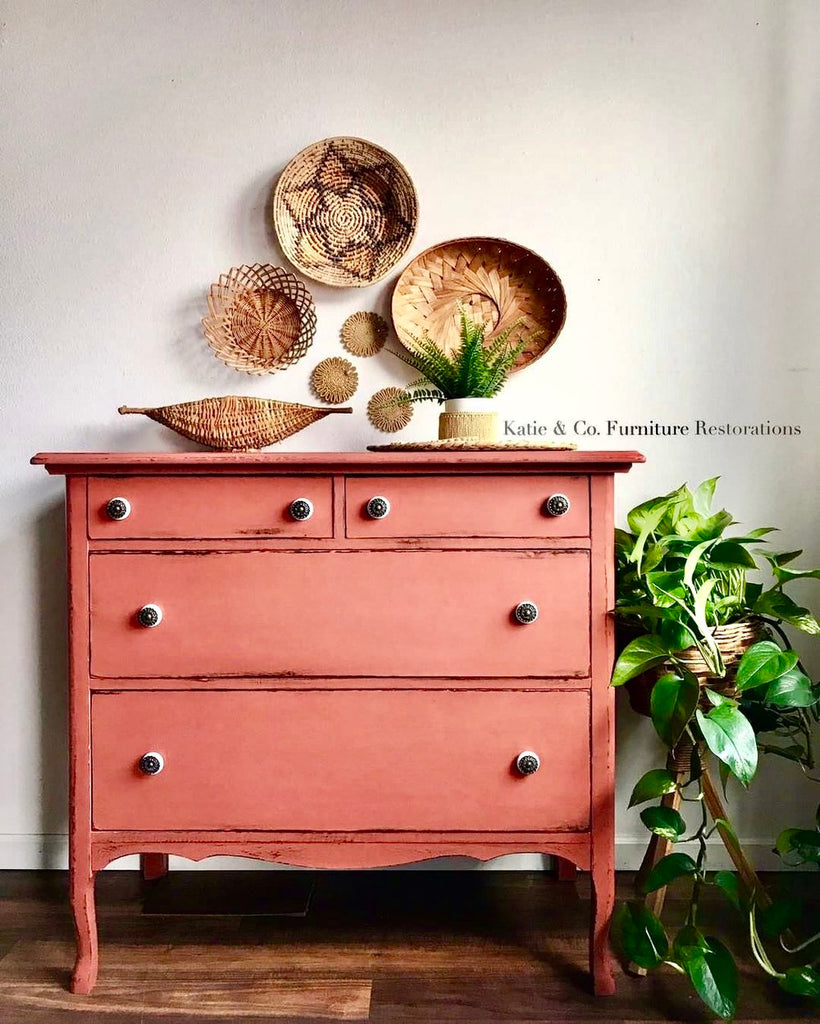
     This dresser I found at my lovely friend Kathy's shop The Flower Theory she has tons of amazing pieces and her floral arrangements are so unique and gorgeous!! I have myself on a weekly flower arrangement schedule because I just love fresh blooms! 

     When I got this dresser from her she had this lovely reclaimed wood top on it. With a fresh coat of OBMP in Amaranth it looks stunning! I am smitten for sure! I usually don't paint in such bright shades, but to be honest I really wanted to pair this outfit with a nice coral and show off our new Boho colors! 


     We did most of the photos here at home, but I wanted a change of scenery so we moved down to Kathy's shop and did some shots there. I found this old metal tool box she let me paint and as usual it turned out to be one of my favorite pieces! 

     I love these little 30 minute projects, you can really apply Milk Paint to anything, just add Bonding Cream if you're worried about chipping and as always have fun, it's just paint! 

     I am so excited to continue to collab with Anthro, I adore the store and am happy to announce we are having a workshop on Sept. 7th at the Broadway Plaza location! So come join me for a fun milk paint workshop in an absolutely beautiful setting! I hope to see all my local peeps there! Be sure to follow me on IG to see more details and upcoming events! 

~Chrystal

Continue reading

Macrame+Milk Paint Anthropologie Workshop

Macrame+Milk Paint Anthropologie Workshop

Last month I did this incredible workshop at Anthropologie! I combined my love for macrame with my love for milk paint and came up with the Macrame + Milk Paint idea. I pitched the idea to the girls at Anthro and they loved it too! So I went to work finding supplies and of course refreshed my very limited macrame skills! 


The first step of our project was to cut our material ( I had rope, yarn, and string available) to double the length of what we wanted our finished project to be. Since you start with a larks head knot which is essentially the yarn folded in half and looped through itself you want to measure each cut to twice the desired length. I showed everyone some simple macrame knots and designs and offered advice on how to get projects started and have a vision for the final piece. Everyone caught on really quick and had so many amazing ideas! I just love how creative and happy this group was! I think they may have been as excited as I was for this workshop! 

Once everyone was pretty well established with their projects I started to see these incredible designs. Every single person had a different vision for their projects and it's one of my first experiences leading such a creative group!  Everyone was so talented!  As the group progressed with their projects we neared my favorite part, milk paint as a dye! YES!! I began to explain how milk paint works and all of the many different uses it has. As we know it is one of the first paints ever created and was used on ancient artifacts and works of art that are on display in history museums today. Since milk paint is a powder you can really decide how thick or thin you want it. You can even use different mediums to mix  it with. You can mix with oils to create an oil paint as I've done in the past creating a beautiful glaze by adding the mp powder into our Oil+Wax. Mix it thick to create texture and use as a gesso, mix it thin to make a wash or a stain, or fabric dye. 

Mixing milk paint as a fabric dye is really simple and uses the smallest amount of mp ever, you only need a teaspoon or so of milk paint powder. Just add a cup of water and mix till all of the powder is dissolved, if the mixture is too dense you can add more water. I like to make sure I have a drop cloth beneath my project and it's easiest to have it hanging for this. This is literally my favorite ever, you can dip the ends of your project in the milk paint, the longer you leave them in the darker they will become. This works so well for an ombre effect, start with dipping the bottom and allowing it to soak for a few seconds, then slowly lower more of ends into the dye and allow them to soak, when you get far enough up to your lightest shade, you just set it in the dye for a few seconds and then wring everything out. If you want a multi colored ombre you can apply the milk paint dye with a paint brush as well. This also works to dye pieces when you don't want the entire project soaked in dye. 


Some of the girls used multiple colors for their projects like Farmstead and Letterbox and they made these super muted ombre effects I absolutely loved! I had so much fun leading this class and meeting these amazing women~ This was by far my favorite workshop to date and I cannot wait for out next workshop in December! I have some super fun project ideas! What would you love to see us create at our next Anthropologie workshop?! Let me know in the comments! 


Happy Painting! 
~Chrystal 

Continue reading

Boho Farmhouse Staging and Decor

Boho Farmhouse Staging and Decor
  1.      It's been a while since I've blogged, a lot has been happening around here! I absolutely feel so blessed and honored that this Old Barn Milk Paint is here for another year! You guys have been so supportive and sweet liking and sharing us and because of all your support we are growing! It is beyond what I could have imagined! 

     As we grow and more people turn to OBMP for Milk Paint I've noticed a new vibe that speaks true to my soul. I am so surprised that the boho in me has come through in Old Barn Milk Paint . You'll notice that we've been nudging toward that natural, boho farmhouse style and I couldn't be more pleased! I have always adored and been drawn to Boho Farmhouse in my personal style, whether it's clothes, hair, decor, jewelry, literally anything!  Just give me all the Boho and all the Farmhouse!! 

     While I dream of being able to decorate my own home again, I thoroughly enjoy seeing all the amazing work done by some of our awesome brand reps! This green dresser painted in Moss by Jen at Fin+Bo  is so perfect!! I love seeing our colors pop and create bold, stunning, statement pieces! The staging for this is also spot on, simple and complimenting the style of the piece allowing it to be the focal point! 

     I love pops of color, I can imagine this lingerie chest painted in Petal in a bright shiplapped room with a beautiful Turkish rug, the ladder and woven baskets on the wall with the cute little plant are the perfect decor motif. Do you see our little linen bag used as a plant cover?! LOVE it! It makes my heart sing to see our bags reused in such a creative way! Kristie at Lee Marie Antiqued Furniture has so much decor and design inspiration going on on her IG feed, I just fly to Canada to meet her! 

     Probably one of our first and most distinctive boho pieces was this washstand painted in Farmstead by Jen. She really has a knack for capturing the bliss of each piece and not overwhelming it with decor pieces. I love how her staging enhances the pieces she does. Look how the wood grain shows through the painted finish here! I see this a lot with tiger oak and pieces with a heavier wood grain, Since Milk Paint absorbs into the finish it's not like applying a thick coat of paint that takes away every ounce of character and charm, instead Milk Paint just enhances the beauty and looks like it's been there for years! 

     Our Oil Wax Finish really brought out the wood grain on this beauty! Jen painted the frame in Silhouette which adds the perfect natural touch to take this one from beauty to stunner! The staging again perfectly compliments without distracting from the main attraction. It can sometimes be hard to stage furniture, but Jen seems to come by in naturally!  The shiplap wall and baskets offer a comforting boho feel! 

     Oh my word! My little boho heart sang when we were tagged on this piece! I mean seriously?!! I love the staging, and love the piece which is a shocker because I swore I would never like MCM. Kristie used Farmstead to completely transform this one and I didn't even recognize that it was Mid Century Modern at first! The baskets, fiddle leaf fig, and the guitar OH MY!!!! My daddy had several guitars when I was growing up. He is such a talented musician, he was even asked to join  Heart before they became a hit (truly a missed opportunity there). This pic makes me so happy, I love how all the tones compliment one another, the wood grains and hues tie in with the color of the baskets and the texture there is offering all the happy feels! 

     Ok, lastly, one of my favorite colors, Pistol Annie. Jen had such a hard time with this buffet, she had first painted it white and knew that it just wasn't quite right... it was probably lovely, but when she painted Pistol Annie over it and revealed this beauty we can see that this is exactly what this piece wanted! Look how happy the photo is! Still simple staging, nothing overpowering the piece, just subtle and complimentary! I absolutely adore this one! Pistol Annie is such a fun color to use, it's neutral and still has enough color and character make a statement! I love it with pops of white like this, stay tuned for my currently project for my youngest son, Viktor, a Pistol Annie dresser with the most adorable knobs from Anthropologie! 

Speaking of... I need to get back to painting! Thank you so much for reading and sharing our journey friends!

Happy Painting

~Chrystal

Continue reading

How to chippy paint authentic architectural salvage corbels

How to chippy paint authentic architectural salvage corbels


     I LOVE corbels, and the older, the better! I have never bought an authentic old corbel because they are just SO expensive! I recently bought a few corbels at Home Depot to share our news stains on. Since then, I've been playing around with the idea to try to replicate the old antique corbels I love so much. 

     I like these corbels at HD, they're pretty and I thought all the detail would look lovely antiqued! The first thing I did was stain the corbel in our One-Step stain in Black Coffee. I then Layered Saddle Brown and Weathered to add as much dimension as possible. 

     I took a chisel and hammer to beat and chip away what I would naturally happen through years of use. I then applied a coat of OBMP Milk Paint in Stoneware in sections, drying them with a heat gun between. Forcing the Milk Paint to dry so quickly causes it to crack and craze, which you see on a lot of antique corbels and balusters. I repeated this process for a few more layers, then added a beige color which you will find on many antique architectural pieces. I did a couple coats of this color using the heat gun between layers as before. At this point I was just slapping paint on and drying it rapidly with the gun. I then did some more coats of Stoneware to finish it off. It looked great so far but I wanted to add some real age to it so I applied OBMP Black Wax. Then I added a bit of our Oil + Wax in the deep recesses and pressed OBMP Dirt into it. I love how the Oil + Wax deepens the color of the Dirt creating a really old dusty look. This wasn't enough for me... of course. I then wiped the entire corbel down and heavily applied the Dirt to the whole thing really caking it into those detailed areas, the effect this achieved was amazing!!! It really muted everything and put this dusty haze over it all and really got into all the cracks. I then grabbed my handy scraper and pulled off the chipped paint here and there. 

     I am loving how this project came out. For something I was just kind of winging as I went, I'm definitely planning to do this to some more pieces in the future!! 

Thanks for reading along today! 

Happy Painting

~Chrystal

Continue reading
Back to top